Are you struggling with a dim or burnt-out light bulb in your range hood? Don’t worry; you’re not alone! Many of us have faced this common kitchen issue. The good news is that replacing a range hood light bulb is a straightforward task that anyone can handle.
How To Replace Range Hood Light Bulb? Replacing a range hood light bulb is a simple task. First, ensure the hood is turned off and cool. Most hoods have a removable cover or panel, which you can usually access from below. Gently remove it, unscrew the old bulb, and replace it with a new one of the same type and wattage. Finally, reattach the cover, and you’re good to go! Always consult your range hood’s manual for specific instructions.
In this easy-to-follow guide, we will walk you through the simple steps to replace your range hood light bulb, ensuring your kitchen remains well-lit for your cooking adventures. No need for any special skills or tools – just a few minutes of your time, and you’ll have a bright and well-lit cooking space once again. Let’s get started on illuminating your culinary journey!
“Lighting Up Your Cooking Space: A Step-by-Step Guide to Replacing Your Range Hood Light Bulb”
When it comes to our kitchens, proper lighting is essential for a safe and enjoyable cooking experience. One crucial element often overlooked is the range hood light.
If you’ve noticed your cooking area isn’t as bright as it used to be, it might be time to replace the light bulb. Don’t worry; it’s a straightforward task that you can easily tackle yourself. In this guide, we’ll walk you through the process step by step.
Gather Your Tools and Materials
Before you begin, make sure you have the necessary tools and materials ready. You’ll need a few simple items:
- A replacement light bulb (check your range hood’s manual for the correct type and wattage)
- A screwdriver (usually Phillips or flathead, depending on your hood)
- Safety gloves (to protect your hands)
- A step stool or ladder (if your range hood is high up)
Turn Off the Power
Safety should always come first. To avoid any electrical mishaps, turn off the power to your range hood. Locate the circuit breaker or switch for your kitchen and switch it off. Double-check that the power is indeed off by trying the light switch.
Remove the Old Bulb
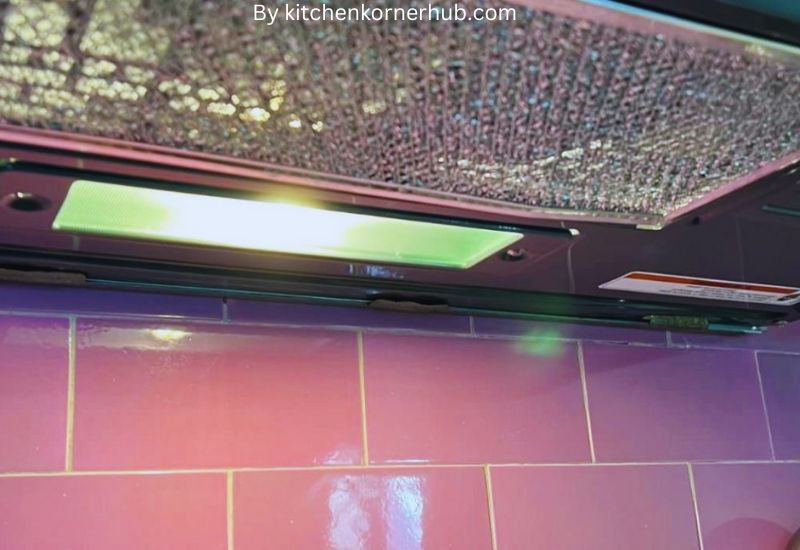
Most range hoods have a protective cover or a glass panel that houses the light bulb. Use your screwdriver to carefully remove this cover. Be gentle to avoid breaking it.
Once the cover is off, you’ll have access to the old bulb. Twist it counterclockwise to remove it from its socket.
Install the New Bulb
Take your new bulb and insert it into the socket. Gently twist it clockwise until it’s snug but not too tight. Avoid over-tightening, as it can damage the bulb or socket.
Replace the Cover
With the new bulb securely in place, put the protective cover or glass panel back on. Use your screwdriver to reattach it. Make sure it’s firmly in position.
Restore Power
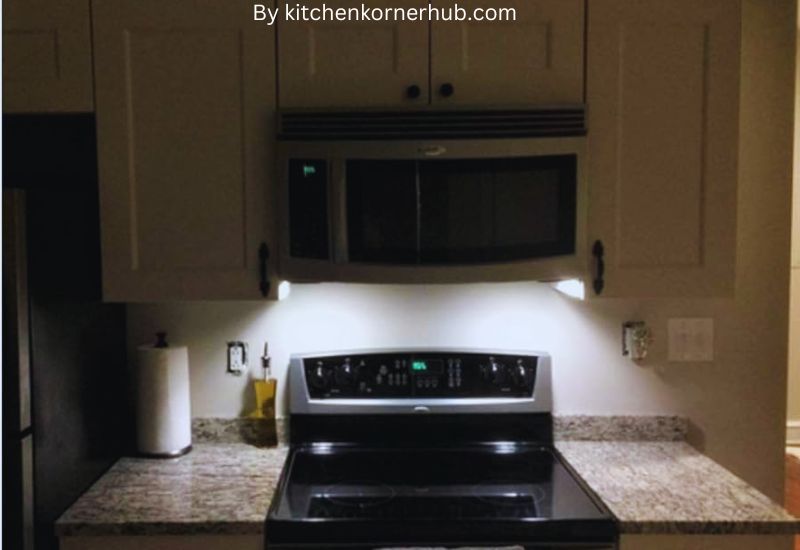
Now that the new bulb is in place and the cover is secure, it’s time to restore power to your range hood. Head back to the circuit breaker or switch you turned off earlier and switch it back on. Test the light to ensure it’s working correctly.
Final Check
Before you consider the job done, give everything one last check. Ensure the bulb is illuminating your cooking space effectively. If you encounter any issues or the light doesn’t work, double-check your steps and, if necessary, consult your range hood’s manual or seek professional help.
In just a few simple steps, you’ve successfully replaced your range hood light bulb, brightening up your cooking space and making meal preparation safer and more enjoyable.
Regular maintenance like this keeps your kitchen in top shape and ensures you can continue to create delicious dishes with ease. Happy cooking!
“Bright Ideas for DIY: Changing Your Range Hood Light Bulb Made Easy”
Are you tired of cooking in the dark because your range hood light bulb has burned out? Don’t worry; we’ve got you covered with some bright ideas for a hassle-free DIY solution. Changing your range hood light bulb may seem like a daunting task, but it can be a straightforward and cost-effective project. In this guide, we’ll walk you through the process step by step, ensuring that you can shine a light on your culinary creations once again.
Safety First: Turn Off the Power
Before you begin, ensure your safety by turning off the power to your range hood. You can do this by switching off the circuit breaker or unplugging the appliance. Safety should always be the top priority when working with electricity.
Gather Your Tools and Replacement Bulb
To make this DIY task a breeze, gather the necessary tools and a replacement light bulb.
You’ll typically need a screwdriver, a step ladder, and a compatible light bulb for your range hood. Be sure to check your range hood’s user manual for the correct bulb specifications.
Remove the Old Bulb
Now, it’s time to remove the old burnt-out bulb. Carefully unscrew it counterclockwise. If the bulb is stuck due to grease or other debris, use a cloth or gloves for a better grip. Once the old bulb is out, set it aside safely.
Clean the Area
While you have the bulb removed, take a moment to clean the area around the socket. Wipe away any accumulated dirt, grease, or dust. A clean surface will help the new bulb work efficiently and last longer.
Insert the New Bulb
Now, insert the new bulb by screwing it in clockwise. Be gentle but firm, and make sure it’s securely in place. Avoid overtightening, as it can damage the bulb or socket.
Restore Power and Test
After securing the new bulb, it’s time to restore power to your range hood. Switch the circuit breaker back on or plug in the appliance.
Turn on the range hood light to test if the new bulb works. If it does, congratulations – you’ve successfully changed your range hood light bulb!
Regular Maintenance
To keep your range hood light shining brightly, it’s a good idea to perform regular maintenance. Check for burnt-out bulbs periodically and replace them promptly to avoid cooking in the dark.
“Shine a New Light on Your Kitchen: Mastering Range Hood Light Bulb Replacement”

Is your kitchen starting to look dim and gloomy? Don’t worry; it’s a common issue that many homeowners face. The good news is that you can easily brighten up your cooking space by replacing the light bulbs in your range hood. In this note, we’ll guide you through the process of range hood light bulb replacement, step by step.
Understanding Your Range Hood
Before you dive into replacing the light bulbs, it’s essential to familiarize yourself with your range hood. Range hoods come in various types, such as ducted and ductless, and each may have a different way of accessing and replacing the light bulbs.
So, check your owner’s manual for specific instructions on how to open the hood and access the bulbs.
Safety First
Safety should always be your top priority when working with electrical components. Make sure to turn off the power to your range hood at the circuit breaker or by unplugging it.
Give the existing bulbs some time to cool down if they were recently in use before touching them.
Removing the Old Bulbs
Once the power is off, it’s time to remove the old light bulbs. Carefully unscrew them counterclockwise from their sockets. If they are stuck, try gently wiggling them back and forth to loosen them. Avoid using excessive force, as it can break the bulbs or damage the socket.
Choosing the Right Replacement Bulbs
Selecting the correct replacement bulbs is crucial for proper illumination. Most range hoods use standard incandescent or LED bulbs. Refer to your owner’s manual or check the markings on the old bulbs to determine the right type and wattage. LEDs are a popular choice due to their energy efficiency and long lifespan.
Installing the New Bulbs
Screw in the new bulbs clockwise into the sockets. Make sure not to overtighten them, as this can cause damage. Once they are securely in place, restore power to your range hood and turn it on to check if the new bulbs are working correctly.
Maintenance Tips
To keep your kitchen well-lit, remember to clean the range hood and bulbs regularly. Grease and grime buildup can reduce the effectiveness of the light. Use a mild detergent and a soft cloth to clean the bulbs and the hood’s interior.
Seek Professional Help if Needed
If you encounter any difficulties or are unsure about handling electrical components, it’s wise to seek the assistance of a professional electrician. Safety should never be compromised when dealing with electricity.
“Illuminating Insights: Tips and Tricks for Range Hood Light Bulb Swaps”

When it comes to brightening up your kitchen, the range hood light plays a crucial role. A well-lit cooking area not only enhances visibility but also adds to the overall ambiance of your kitchen. However, changing a range hood light bulb may seem like a daunting task for some.
Fear not! In this guide, we’ll shed light on some illuminating insights, offering you tips and tricks for a hassle-free range hood light bulb swap.
Choosing the Right Bulb
Before diving into the replacement process, ensure you select the appropriate light bulb for your range hood.
Typically, range hoods use either LED or halogen bulbs. LEDs are energy-efficient and have a longer lifespan, while halogens provide a warm, cozy glow. Check your range hood’s user manual for specific bulb recommendations.
Safety First
Safety is paramount when dealing with electrical appliances. Before starting, turn off the range hood and unplug it if possible. Allow the existing bulb to cool down if it has been in use recently to avoid burns. Additionally, have a pair of protective gloves on hand to protect your hands and ensure a firm grip while handling the bulb.
Removing the Old Bulb
To remove the old bulb, you may need to open the range hood’s cover or access panel. Carefully unscrew the old bulb in a counterclockwise direction (lefty loosey), keeping a firm grip on it as you remove it. Be cautious not to damage any wiring or other components inside the hood.
Installing the New Bulb
Now, it’s time to bring in the new bulb. Screw it into the socket in a clockwise direction (righty tighty) until it’s snug but not overly tightened. Over-tightening can lead to difficulties when removing the bulb in the future.
Testing and Adjusting
Before closing the cover or access panel, turn the range hood back on and check if the new bulb is functioning correctly.
If the light doesn’t come on, double-check the bulb’s installation and make sure it’s compatible with your range hood. If everything looks good, close the cover or panel and secure it in place.
Maintenance Tips
To keep your range hood’s lighting in top condition, periodically clean the bulbs and surrounding areas to remove grease and dirt buildup.
This not only enhances the lighting but also prolongs the bulb’s life. Additionally, consider replacing all the bulbs at once if one starts to dim, as this ensures uniform lighting.
“Enlightened Cooking: A User-Friendly Tutorial on Replacing Range Hood Light Bulbs”

Introduction
If you’ve ever found yourself in the dimly lit world of cooking, struggling to see what’s sizzling in your pots and pans, you’re not alone. The range hood light bulb, often overlooked, plays a vital role in providing the illumination you need while cooking.
In this user-friendly tutorial, we’ll guide you through the simple steps of replacing those pesky range hood light bulbs, shedding light on the path to a brighter and safer cooking experience.
Why Replace Range Hood Light Bulbs?
Before we dive into the how-to, let’s understand why it’s crucial to replace these bulbs. Dim or burnt-out bulbs can hinder your cooking process, making it difficult to monitor food, leading to potential accidents.
Moreover, insufficient lighting strains your eyes and can even affect the ambiance of your kitchen.
Gathering Your Tools
Before you embark on this enlightening journey, gather the following tools: a replacement light bulb (make sure it’s compatible with your range hood), a step ladder, a soft cloth, and, if needed, a screwdriver.
Safety First
Before you start any maintenance work, ensure your range hood is turned off and unplugged. Safety is a top priority, and working with electricity demands caution. Give the existing bulb some time to cool down if it’s been recently used.
Replacing the Bulb
Access the Bulb:
Locate the light bulb cover or lens on your range hood. This cover is usually secured with clips or screws. Carefully remove it using a screwdriver or by pressing the clips gently.
Remove the Old Bulb:
Once you’ve removed the cover, unscrew the old bulb by turning it counterclockwise. If it’s stuck, use a soft cloth to grip and turn it gently. Be cautious not to apply excessive force, as it may break.
Insert the New Bulb:
Screw in the new light bulb by turning it clockwise until it’s snugly in place. Remember not to overtighten it, as this can damage the socket.
Replace the Cover:
After successfully replacing the bulb, reattach the cover by securing it with clips or screws, depending on your range hood’s design.
Testing the New Bulb
Now that you’ve completed the replacement, plug in your range hood, and turn it on. Ensure the new bulb lights up as expected. If everything looks bright and right, congratulations! You’ve successfully replaced your range hood light bulb.
Conclusion
In wrapping up, replacing a range hood light bulb is a straightforward task that anyone can tackle. Remember to turn off the power, let the old bulb cool down, and carefully unscrew it. Then, gently insert the new bulb, making sure not to overtighten it. Finally, restore power and test the light. Safety first and patience second, and you’ll have a well-lit kitchen once more. So, go ahead, brighten up your cooking space with confidence, and enjoy your well-lit culinary adventures!
Frequently Asked Question(How To Replace Range Hood Light Bulb)
How do you change a lightbulb in a range hood?
Changing a lightbulb in a range hood is a relatively simple task that can brighten up your cooking space. To start, make sure the range hood is turned off and unplugged from the power source for safety. Next, locate the cover or panel that shields the lightbulb. It’s usually on the underside of the range hood. Gently remove the cover or panel by unscrewing any screws or clips holding it in place.
Once the cover is off, carefully unscrew the old lightbulb in a counterclockwise direction. Be cautious when handling the old bulb, as it may still be hot if it was recently turned off. Dispose of the old bulb properly. Now, screw in the new lightbulb in a clockwise direction until it’s snug but not overly tight. Finally, reattach the cover or panel, secure it in place, plug in your range hood, and turn it on to ensure the new bulb is working.
Are all range hood light bulbs the same?
Range hood lightbulbs can vary in terms of type and wattage, so they are not all the same. It’s important to check your range hood’s user manual or the existing bulb’s specifications to determine the correct replacement. Common types of bulbs used in range hoods include halogen, incandescent, or LED bulbs.
Additionally, wattage may differ, so make sure to select a bulb that matches the recommended wattage for your specific range hood model. Using the wrong bulb type or wattage can lead to overheating and potentially cause damage to your range hood.
What light bulb do I use in a range hood?
Choosing the right light bulb for your range hood is crucial to ensure proper illumination in your kitchen. Typically, range hoods use either halogen, incandescent, or LED bulbs. To determine which bulb to use, first check the user manual or the existing bulb’s specifications for your range hood model. If that information is not available, you can usually find it imprinted on the base of the old bulb.
Pay attention to the bulb’s type and wattage. Halogen and incandescent bulbs are often replaceable with each other, while LED bulbs are becoming more common due to their energy efficiency and longer lifespan. Make sure to select a bulb with the same type and wattage as the one you are replacing to maintain proper lighting in your range hood.
How do you install a gu10 bulb on a range hood?
Installing a GU10 bulb on a range hood is relatively straightforward. First, ensure the range hood is disconnected from the power source and turned off for safety. Locate the cover or panel that shields the existing bulb. This cover is typically found on the underside of the range hood. Carefully remove the cover by unscrewing any screws or clips holding it in place. Once the cover is off, you’ll likely see the old bulb, which you should gently unscrew in a counterclockwise direction.
Dispose of the old bulb properly. Now, take your GU10 bulb and insert it into the socket, making sure it’s aligned correctly. Then, gently twist the bulb in a clockwise direction until it’s snug but not overly tight. Reattach the cover or panel, secure it in place, plug in your range hood, and turn it on to check if the new GU10 bulb is functioning properly and providing the desired lighting in your kitchen.