Installing a range hood may seem like a daunting task, but fear not! In this guide, we’ll walk you through the simple steps to make your kitchen a more comfortable and odor-free space. Whether you’re a seasoned DIY enthusiast or a novice, our easy-to-follow instructions will help you get the job done with confidence.
A range hood, also known as an extractor or vent hood, plays a crucial role in maintaining a clean and well-ventilated kitchen. It helps remove cooking odors, smoke, and grease, keeping the air in your kitchen fresh and your home smelling pleasant. Plus, it protects your kitchen from the sticky residue that can accumulate on surfaces over time.
How To Install Range Hood? To install a range hood, begin by shutting off power and removing the old unit if applicable. Next, mark the installation location, cut an opening if necessary, and secure the mounting bracket. Connect the wiring, attach the ductwork, and finally, mount the range hood, ensuring it’s level. Test it and adjust as needed for proper ventilation.
In this comprehensive guide, we’ll cover everything you need to know to install a range hood efficiently and safely. From gathering the necessary tools and materials to understanding the different types of range hoods available, we’ll ensure that you’re well-prepared for the installation process. So, let’s roll up our sleeves and get ready to transform your kitchen into a more enjoyable and functional space!
Choosing the Right Range Hood: A Step-by-Step Guide

When it comes to creating an efficient and comfortable kitchen environment, a range hood plays a crucial role. Not only does it help to eliminate cooking odors and smoke, but it also enhances the overall aesthetic of your kitchen.
Choosing the right range hood can be a daunting task, as there are various factors to consider. In this comprehensive guide, we’ll walk you through the process step by step to ensure you make an informed decision.
Assess Your Cooking Needs
Before diving into the world of range hoods, take a moment to assess your cooking habits and needs. Consider the size of your kitchen, the type of stove you have, and the frequency of your cooking adventures.
If you’re an avid chef who loves to cook with strong-smelling ingredients, a powerful range hood with a higher CFM (cubic feet per minute) rating may be necessary. For smaller kitchens or occasional cooks, a less robust option might suffice.
Determine the Hood Type
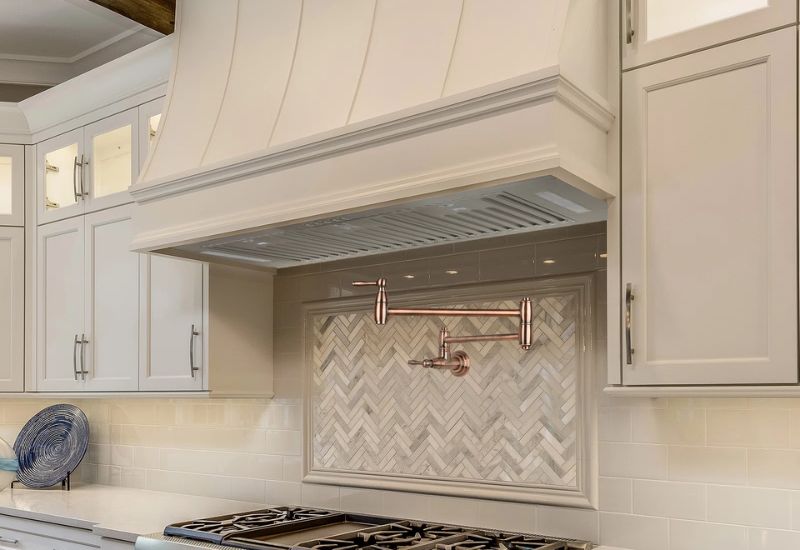
Range hoods come in various types, each with its unique features and benefits. The most common types include under-cabinet, wall-mounted, island, and downdraft hoods. Under-cabinet hoods are ideal for kitchens with cabinets above the stove, while wall-mounted hoods are suitable for kitchens with an open wall. Island hoods are perfect for kitchen islands, and downdraft hoods are a great space-saving option. Choose the type that best fits your kitchen layout and style.
Consider Ventilation and Ducting
Ventilation is a crucial aspect of range hoods. You can opt for a ducted or ductless system, depending on your kitchen’s configuration. Ducted hoods vent air to the outside through ductwork, which is highly effective in removing odors and pollutants.
On the other hand, ductless hoods filter and recirculate the air within the kitchen, making them suitable for kitchens where duct installation is challenging. However, ducted systems are generally more efficient at removing contaminants.
Pay Attention to Size and Design
The size of your range hood should complement the size of your stove or cooktop. Ideally, it should cover the entire cooking surface to effectively capture smoke and odors. Additionally, consider the design of the range hood to ensure it matches your kitchen’s aesthetic.
Range hoods come in a variety of styles, from sleek and modern to classic and decorative, allowing you to find one that suits your kitchen’s decor.
Noise Levels and Additional Features
Lastly, take into account the noise level of the range hood. Some models come with sound-reduction features, such as quiet motors and noise-absorbing panels, making them more pleasant to use.
Additionally, explore any additional features like adjustable fan speeds, lighting options, and smart technology integration. These extras can enhance the functionality and convenience of your range hood.
Gathering Your Tools and Materials for Range Hood Installation
When embarking on the installation of a range hood in your kitchen, careful preparation is essential to ensure a smooth and successful project.
Gathering the right tools and materials is the first crucial step toward achieving a professional-looking installation. In this comprehensive note, we’ll discuss the key items you need to gather before you begin.
Safety Gear and Precautions:
Before diving into any DIY project, safety should be your top priority. Gather essential safety gear such as safety glasses, work gloves, and a dust mask.
These items will protect you from potential hazards like flying debris and dust during the installation process. Additionally, turn off the power to the range hood circuit at your electrical panel to prevent any electrical accidents.
Basic Tools:
A set of basic hand tools is indispensable for range hood installation. You’ll need a screwdriver, adjustable wrench, pliers, measuring tape, level, pencil, and a utility knife.
These tools will assist you in measuring, marking, and securing the range hood components correctly.
Electrical Supplies:
If your range hood requires electrical wiring or has built-in lighting, gather the necessary electrical supplies. You may need electrical wire, wire connectors, a junction box, and a voltage tester to ensure the electrical connections are safe and secure.
It’s crucial to consult your range hood’s installation manual for specific electrical requirements.
Mounting Hardware:
The proper mounting hardware is crucial for securely attaching the range hood to the wall or ceiling. This includes wall anchors, screws, and brackets designed to support the weight of the hood.
The type of hardware you need will depend on your specific installation method, whether it’s wall-mounted, under-cabinet, or island range hood installation.
Ducting and Venting Materials:
Adequate ventilation is key to the effectiveness of your range hood. Depending on your kitchen’s layout, you may need to gather materials like ductwork, elbows, connectors, and vent caps.
Properly venting the range hood ensures that cooking odors and airborne grease are efficiently expelled from your kitchen, maintaining a healthier indoor environment.
Preparing Your Kitchen for Range Hood Installation: Tips and Tricks

: Assess Your Kitchen Layout :
Before embarking on a range hood installation project, it’s essential to assess your kitchen’s layout. Determine the ideal location for your range hood based on the placement of your stove or cooktop.
Consider factors such as the distance between the cooking surface and the hood, as well as any existing ventilation ductwork. This initial assessment will help you choose the right type and size of range hood for your kitchen.
Choose the Right Range Hood:
Selecting the appropriate range hood is crucial to ensure effective ventilation and a seamless installation process. There are several types of range hoods to choose from, including wall-mounted, under-cabinet, island, and downdraft hoods.
Each type has its unique installation requirements and aesthetic considerations. Additionally, consider factors such as airflow capacity (measured in cubic feet per minute, or CFM) and noise levels to find a range hood that suits your cooking needs and preferences.
Prepare for Electrical and Ductwork:
If your kitchen doesn’t already have a range hood in place, you’ll need to prepare for the installation of electrical wiring and ductwork. Hire a licensed electrician to ensure that your kitchen has the necessary power supply for the range hood.
For ducted range hoods, plan the route for the ventilation ducts, and make any required adjustments to accommodate the hood’s placement. If ductwork is not feasible, consider ductless (recirculating) range hoods that filter and recirculate the air within your kitchen.
Clear the Installation Area:
Before the installation day, clear the area around your stove or cooktop to provide easy access for the installation team.
Remove any items from your countertops and cabinets to prevent dust and debris from contaminating your kitchen during the installation process. Taking these steps will ensure a smoother and cleaner range hood installation.
Hire a Professional Installer:
While some homeowners may attempt DIY range hood installations, it’s often best to hire a professional installer, especially if you have complex ductwork or electrical requirements.
Experienced technicians have the knowledge and tools to complete the installation safely and efficiently, ensuring that your range hood functions optimally. Moreover, professionals can provide valuable advice on maintenance and troubleshooting, helping you enjoy your kitchen’s improved ventilation for years to come.
Wiring and Ventilation: Key Considerations for Installing a Range Hood

When it comes to installing a range hood in your kitchen, it’s essential to pay close attention to the wiring and ventilation aspects.
A properly installed range hood not only improves indoor air quality but also enhances the overall functionality and aesthetics of your kitchen. In this comprehensive note, we will explore the critical considerations for wiring and ventilation to ensure a successful range hood installation.
Electrical Wiring Requirements:
Before you start installing your range hood, it’s crucial to ensure that your kitchen has the appropriate electrical wiring in place. Range hoods typically require a dedicated circuit, so it’s essential to check your local electrical codes to determine the specific requirements.
If your kitchen lacks the necessary wiring, it’s best to consult a professional electrician to safely install a new circuit. A properly wired range hood will operate efficiently and reduce the risk of electrical hazards.
Voltage and Amperage Ratings:
Range hoods come in various models and sizes, each with its own voltage and amperage requirements. To avoid overloading your electrical circuit, it’s essential to match the range hood’s voltage and amperage ratings with the capacity of your wiring and circuit breaker.
Oversized range hoods can strain your electrical system and potentially lead to tripped breakers or electrical fires. Always consult the manufacturer’s specifications and, if in doubt, seek professional guidance.
Ventilation Ductwork:
Proper ventilation is the core function of a range hood, and it relies heavily on the ductwork. The size, material, and installation of the ventilation ducts play a crucial role in the range hood’s efficiency. Ensure that the ductwork is appropriately sized for the hood’s capacity, and that it follows the shortest and most direct path to the exterior of your home.
Flexible or rigid ducts made of materials such as galvanized steel or aluminum are recommended for efficient airflow. A well-designed ventilation system eliminates odors, grease, and airborne pollutants effectively.
Ductless vs. Vented Installation:
When installing a range hood, you’ll need to decide between ductless and vented options. Ductless hoods filter and recirculate the air, while vented hoods expel it outside. The choice largely depends on your kitchen’s layout and your preference.
Vented hoods are more efficient at removing cooking byproducts, but they require proper ductwork installation. Ductless hoods are easier to install but may not be as effective at removing pollutants. Consider your cooking habits and kitchen setup when making this decision.
Professional Installation vs. DIY:
While some homeowners may opt for a DIY installation, it’s often advisable to enlist the services of a professional for wiring and ventilation aspects, especially if you’re uncertain about electrical work or duct installation.
Professionals have the knowledge and experience to ensure the range hood is safely and correctly installed, complying with local building codes. They can also help you choose the right location for optimal performance.
Mounting Your Range Hood: Installation Techniques for Success

Mounting a range hood is a crucial step in ensuring a functional and aesthetically pleasing kitchen. Whether you’re replacing an old unit or installing a new one, proper installation is key. In this comprehensive note, we’ll guide you through the essential techniques for successfully mounting your range hood.
Gather Your Tools and Materials
Before you begin the installation process, make sure you have all the necessary tools and materials. You’ll typically need a screwdriver, a drill, a level, measuring tape, wall anchors, and appropriate screws.
Check the manufacturer’s instructions to ensure you have all the specific components required for your range hood model.
Measure and Mark the Position
Accurate measurements are critical to ensure your range hood is centered and at the correct height above your cooktop.
Measure the width of your range and mark the midpoint on the wall. Next, determine the ideal mounting height, usually 24 to 30 inches above the cooking surface, and mark this position on the wall as well. Use a level to make sure your marks are perfectly horizontal.
Locate Wall Studs or Use Wall Anchors
Sturdy support for your range hood is essential to prevent accidents and ensure a secure installation. Locate the wall studs behind your marked positions using a stud finder. If your studs don’t align with your marks, you’ll need to use wall anchors.
Drill holes for the anchors and attach them securely to the wall. Make sure to choose anchors that can support the weight of your range hood.
Mount the Range Hood
With the support in place, it’s time to mount the range hood. Enlist the help of a friend or family member to hold the unit in position while you secure it to the wall.
Follow the manufacturer’s instructions for your specific model, but typically, you’ll attach the hood to the wall using screws or brackets. Ensure that the unit is level and securely fastened.
Connect Ventilation and Electrical
Once the range hood is securely mounted, you’ll need to connect the ventilation and electrical components. Attach the ductwork or ductless conversion kit as required, making sure it aligns with your kitchen’s ventilation system.
For electrical connections, follow local electrical codes and, if necessary, hire a licensed electrician to wire the range hood to your power source.
Conclusion
In conclusion, installing a range hood is a manageable task that can greatly enhance the functionality and cleanliness of your kitchen. By following the steps outlined in this guide, you can ensure that the installation process is smooth and efficient. Remember to prioritize safety, accurately measure and position the hood, and connect the necessary electrical and ventilation components. With careful planning and attention to detail, you’ll not only improve the air quality in your kitchen but also add a stylish and functional element to your cooking space. So, don’t hesitate to embark on this DIY proj
Frequently Asked Question(How To Install Range Hood)
Can I install a range hood myself?
Installing a range hood yourself is certainly possible, but it’s essential to consider your DIY skills and familiarity with electrical and ventilation systems. The complexity of the installation can vary depending on the type of range hood you have (ductless or ducted), the existing infrastructure in your kitchen, and local building codes.
If you have experience with electrical wiring, carpentry, and some basic handyman skills, you may be able to tackle the installation successfully by following the manufacturer’s instructions. However, if you’re unsure about any aspect of the installation or if it involves complex ductwork or electrical work, it’s advisable to consult a professional to ensure safety and proper functioning.
How should a range hood be installed?
The installation of a range hood involves several steps, and the specific process can vary depending on whether you have a ducted or ductless hood. Generally, for a ducted range hood, you’ll need to:
a. Choose the right location: Locate the ideal position above your cooking surface, ensuring it’s centered and at the appropriate height. b. Prepare the mounting area: Depending on the hood type, you may need to cut a hole for the ductwork or secure brackets for mounting.
c. Electrical connections: If your range hood has a fan or lights, you’ll need to connect it to the electrical supply. d. Ventilation: If ducted, connect the range hood to an external duct that expels cooking fumes and odors outside. If ductless, install carbon filters to recirculate the air. e. Secure the hood: Attach the range hood to the mounting area or brackets securely. f. Test and adjust: Turn on the range hood to ensure it’s functioning correctly, and make any necessary adjustments.
Is it difficult to install a range hood?
The difficulty of installing a range hood can vary based on your experience, the type of range hood, and the existing kitchen infrastructure. Installing a basic ductless range hood with no additional electrical work or complex ductwork can be relatively straightforward for someone with moderate DIY skills.
However, if you’re dealing with a ducted hood, need to perform electrical wiring, or face challenges related to the kitchen layout and venting, the installation can become more complex. It’s essential to carefully read the manufacturer’s instructions, assess your skills and comfort level with the necessary tasks, and consider consulting a professional if you have any doubts. Safety and proper installation are paramount.
Do range hoods have to be vented outside?
Range hoods do not necessarily have to be vented outside, but the choice between vented (ducted) and non-vented (ductless) depends on your kitchen setup and preferences. Vented range hoods are more effective at removing cooking fumes, smoke, and odors since they expel them outdoors through a duct system. Ductless range hoods, on the other hand, use filters to purify the air before recirculating it back into the kitchen. While ductless hoods are easier to install, they may be less effective in capturing all the airborne particles.
The decision to vent a range hood outside or use a ductless option depends on factors like your kitchen’s layout, the feasibility of running ductwork, local building codes, and your personal priorities. If possible, venting outside is usually the preferred choice for better air quality, but ductless hoods can still provide some level of ventilation in situations where external venting is not practical.