
Welcome to our guide on how to clean range hood filters! Range hoods are essential appliances in our kitchens, helping to remove smoke, grease, and odors while we cook. However, over time, their filters can become clogged with grease and grime, affecting their efficiency. In this simple and user-friendly tutorial, we will walk you through the steps to keep your range hood filters clean and working optimally.
How To Clean Range Hood Filters? To clean range hood filters, remove them from the hood and soak in hot, soapy water. Scrub with a brush, rinse thoroughly, and let dry before reinstalling. Repeat this process regularly to maintain optimal performance and reduce grease buildup.
A clean range hood filter not only ensures that your kitchen stays fresh and free from cooking odors but also prolongs the lifespan of your appliance. You don’t need any special skills or tools to get the job done – just a bit of time and effort. Whether you have a mesh or baffle filter, we’ll provide you with easy-to-follow instructions on how to remove, clean, and reinstall them. By the end of this guide, you’ll have a sparkling clean range hood filter that’s ready to tackle any cooking mess you throw at it. So, let’s get started and make your kitchen air cleaner and more pleasant to breathe!
Understanding Range Hood Filters

Range hood filters play a crucial role in maintaining indoor air quality and keeping your kitchen clean. They are an essential component of any kitchen ventilation system. In this comprehensive note, we will delve into the various aspects of range hood filters, from their types to maintenance.
Types of Range Hood Filters
Range hood filters come in different types, and each type has its unique characteristics. The three primary types are:
Mesh Filters:
Mesh filters are typically made of aluminum or stainless steel and consist of multiple layers of mesh. They are excellent at trapping grease and require regular cleaning to maintain their effectiveness.
Baffle Filters:
Baffle filters are constructed with multiple panels or baffles made of metal. These filters are designed to trap grease and are often dishwasher-safe, making them easier to clean than mesh filters.
Charcoal Filters:
Charcoal filters, also known as carbon filters, are used in ductless range hoods. They excel at absorbing odors and smoke particles but need periodic replacement as they become saturated over time.
Function of Range Hood Filters
The primary function of range hood filters is to capture and remove airborne contaminants generated during cooking. These contaminants include grease, smoke, cooking odors, and even airborne particles.
By doing so, range hood filters help maintain a healthier indoor environment and prevent the buildup of grease on kitchen surfaces.
Importance of Regular Maintenance
Proper maintenance of range hood filters is essential for their effectiveness and the longevity of your kitchen ventilation system. Regular cleaning, depending on the type of filter, is crucial. Grease buildup on filters not only reduces their efficiency but can also pose a fire hazard.
Mesh and baffle filters should be cleaned with warm, soapy water or placed in the dishwasher, while charcoal filters need replacement as recommended by the manufacturer.
Installation and Replacement
When installing a range hood or replacing filters, it’s vital to follow the manufacturer’s guidelines. Filters should fit snugly and securely to ensure efficient operation.
When replacing charcoal filters, it’s important to use the correct type and follow the recommended schedule to maintain optimal odor and smoke removal.
Upgrading Your Range Hood Filters
If you’re looking to enhance the performance of your range hood, consider upgrading your filters. High-quality filters with advanced technology can provide better filtration and odor removal.
Additionally, some range hoods offer filter indicator lights that signal when it’s time for cleaning or replacement, simplifying maintenance.
Gathering Supplies for Cleaning
Cleaning is an essential task that helps maintain a clean and healthy living environment. To effectively tackle cleaning projects, it’s crucial to gather the right supplies. Here, we’ll explore the key steps and considerations for gathering supplies for cleaning.
Assessing Your Cleaning Needs:
Before you begin gathering supplies, it’s essential to assess your cleaning needs. Consider the size and type of space you’ll be cleaning, the specific surfaces you’ll be addressing, and any special requirements or challenges.
Different areas, such as kitchens, bathrooms, bedrooms, and outdoor spaces, may require different cleaning products and tools.
Basic Cleaning Supplies:
Every cleaning kit should include some basic cleaning supplies:
Cleaning Solutions:
Invest in all-purpose cleaners, glass cleaners, disinfectants, and specialized solutions for specific surfaces like wood or stainless steel.
Cleaning Tools:
Gather a variety of cleaning tools, including microfiber cloths, sponges, scrub brushes, mop and bucket, and a vacuum cleaner with attachments for different surfaces.
Trash Bags:
Keep a supply of trash bags on hand for easy disposal of garbage and clutter.
Specialized Cleaning Supplies: Depending on your cleaning needs, you may require specialized supplies:
Cleaning Appliances:
Consider investing in appliances like steam cleaners, carpet cleaners, or pressure washers for deep cleaning tasks.
Stain Removers:
Stock stain removers for fabrics and carpets, as well as rust removers and mold/mildew cleaners for specific cleaning challenges.
Eco-Friendly Options:
If you prefer eco-friendly cleaning, look for biodegradable and non-toxic cleaning products and reusable cleaning cloths.
Safety and Protective Gear: Safety should always be a priority when cleaning. Depending on the task, gather appropriate safety gear:
Gloves:
Protect your hands with latex or rubber gloves, especially when dealing with harsh chemicals or allergenic substances.
Masks: For tasks involving dust, allergens, or strong cleaning agents, consider wearing a mask to safeguard your respiratory health.
Eye Protection:
When handling chemicals or using power tools, safety goggles can shield your eyes from potential hazards.
Organizing and Storage:
Once you’ve gathered your cleaning supplies, it’s crucial to keep them organized and stored properly:
Storage Solutions:
Invest in storage bins, caddies, or a designated cleaning closet to keep your supplies neatly organized and easily accessible.
Labeling:
Label containers and bottles to avoid confusion and ensure you can quickly find the right product when needed.
Regular Inventory Checks:
Periodically check your supplies to ensure nothing has expired or run out. Restock items as necessary to maintain an efficient cleaning routine.
Step-by-Step Guide to Removing Range Hood Filters

Introduction: Range hood filters play a crucial role in keeping your kitchen clean and free of grease and odors. However, over time, these filters can become clogged and less effective. To maintain the efficiency of your range hood, it’s important to know how to properly remove and clean or replace the filters. In this step-by-step guide, we will walk you through the process of removing range hood filters, ensuring your kitchen stays fresh and functional.
Gather Your Supplies:
Before you start, gather the necessary supplies. You’ll typically need a screwdriver, a bucket or basin, warm soapy water, a scrub brush or sponge, and a towel or dishcloth. Ensure that the range hood is turned off and unplugged for safety.
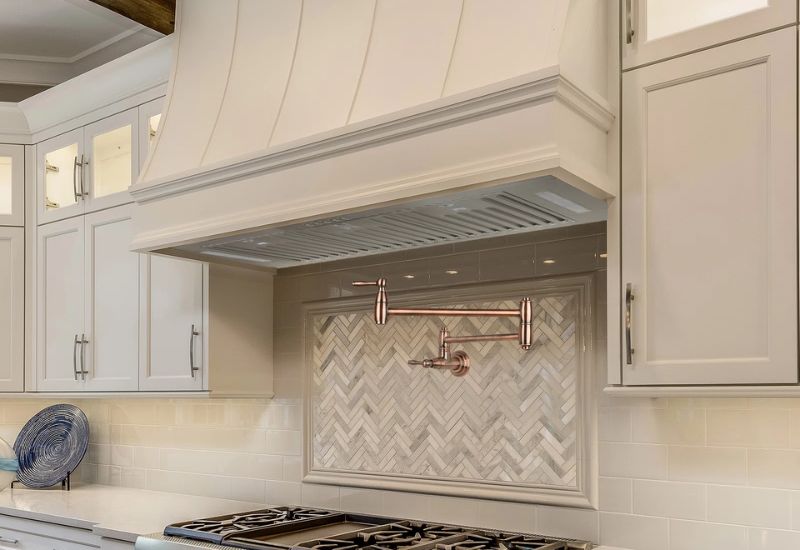
Locate and Access the Filters:
The first step is to identify the location of your range hood filters. Most range hoods have either aluminum or mesh filters.
These filters are typically found either beneath the range hood or inside it, depending on the model. Refer to your range hood’s user manual if you’re unsure about the location.
Remove the Filters:
To remove the filters, you’ll need to access them. This often involves opening a latch or unscrewing a cover. Use a screwdriver to remove any screws holding the filters in place.
Once the cover is removed, carefully slide or lift out the filters. Be cautious, as these filters may be covered in greasy residue.
Clean or Replace the Filters:
Depending on the type of filters you have, you can either clean or replace them. Aluminum filters can typically be cleaned by soaking them in warm, soapy water and scrubbing them with a brush or sponge to remove grease and debris.
Mesh filters may need to be replaced if they are too clogged or damaged. Follow the manufacturer’s instructions for cleaning or replacing your specific filter type.
Reassemble and Test:
After cleaning or replacing the filters, ensure they are completely dry before reassembling them. Carefully slide the filters back into place and secure them with the screws or latches you removed earlier.
Double-check that everything is properly in position before turning your range hood back on to test its functionality.
Cleaning Range Hood Filters with Natural Solutions

Cleaning range hood filters is an essential part of kitchen maintenance to ensure efficient ventilation and keep the air in your kitchen clean. While there are numerous commercial cleaners available, using natural solutions is not only eco-friendly but also cost-effective.
In this article, we’ll explore various natural solutions for cleaning range hood filters, helping you maintain a healthier and cleaner kitchen environment.
Vinegar and Baking Soda Mix
One of the most effective natural solutions for cleaning range hood filters is a mixture of vinegar and baking soda. Start by removing the filters and placing them in a large container. Sprinkle a generous amount of baking soda over the filters and then pour white vinegar over them.
The chemical reaction between the two will create effervescence, helping to break down the grease and grime. After soaking for 15-20 minutes, scrub the filters with a brush and rinse thoroughly with hot water. This method not only cleans but also deodorizes the filters.
Lemon Juice and Dish Soap
Lemon juice is a natural degreaser with a pleasant scent. To clean your range hood filters using this method, create a mixture of warm water, a few tablespoons of lemon juice, and a squirt of dish soap.
Soak the filters for about 30 minutes, then scrub away the grease and residue with a soft brush. Rinse thoroughly with warm water and let them air dry. The citric acid in lemon juice effectively cuts through the grease, leaving your filters sparkling clean.
Boiling Water
For a quick and easy cleaning method, you can use boiling water. Remove the filters from the range hood and place them in a heat-resistant container. Carefully pour boiling water over the filters, ensuring they are fully submerged.
Allow them to soak for about 10-15 minutes. The high temperature will melt away the grease and grime, making it easy to scrub them clean with a brush. Rinse with hot water to remove any remaining residue.
Salt and Club Soda
Club soda, combined with salt, can be a surprisingly effective natural solution for cleaning range hood filters. Sprinkle a generous amount of salt on the filters and then pour club soda over them. Let the mixture sit for about 15 minutes, allowing the carbonation to break down the grease. Scrub the filters with a brush and rinse them thoroughly with hot water. This method is particularly useful for stubborn, caked-on grease.
Regular Maintenance
Prevention is always the best approach to keep your range hood filters clean. Make it a habit to wipe down the filters regularly with a damp cloth or sponge after cooking.
This simple step can significantly reduce the buildup of grease and make the deep cleaning process less frequent.
Using Commercial Cleaners for Filter Maintenance

Introduction: Proper maintenance of filters is essential for maintaining the efficiency and longevity of various equipment and systems, such as HVAC systems, water purifiers, and industrial machinery.
Commercial cleaners play a crucial role in simplifying the filter maintenance process and ensuring optimal performance. In this article, we will explore the benefits and best practices of using commercial cleaners for filter maintenance.
Benefits of Using Commercial Cleaners:
Commercial cleaners offer numerous advantages when it comes to filter maintenance. Firstly, they are specifically formulated to target and remove the contaminants and build-up that accumulate on filters, ensuring a thorough cleaning process.
Secondly, these cleaners are often more potent and effective than DIY alternatives, saving time and effort. Additionally, they are designed to be safe for the materials used in filters, preventing damage and extending their lifespan.
Types of Filters That Benefit:
Commercial cleaners are versatile and suitable for various types of filters, including air filters, oil filters, water filters, and more.
Air filters, commonly found in HVAC systems, benefit from regular cleaning with commercial cleaners as it helps maintain indoor air quality and reduces energy consumption. Oil filters in vehicles and industrial machinery can also be cleaned effectively using these cleaners, preventing engine damage and optimizing performance.
Choosing the Right Commercial Cleaner:
Selecting the appropriate commercial cleaner is crucial for successful filter maintenance. It’s essential to consider the type of filter, the contaminants it encounters, and any specific manufacturer recommendations. Read labels carefully, and choose a cleaner that is compatible with the filter material and contaminants you need to remove. For example, some filters may require a degreaser for oil-based contaminants, while others may need a disinfectant for biological contaminants.
Proper Application and Safety:
When using commercial cleaners for filter maintenance, it’s important to follow the manufacturer’s instructions precisely. Wear appropriate personal protective equipment, such as gloves and goggles, to ensure your safety. Ensure that the cleaning process is carried out in a well-ventilated area to avoid inhaling fumes.
Always shut off and disconnect any equipment before cleaning its filters. Additionally, allow adequate time for the cleaner to work before rinsing or reinstalling the filters.
Regular Maintenance Schedule:
To maximize the benefits of using commercial cleaners for filter maintenance, establish a regular maintenance schedule. Filters should be cleaned or replaced according to the manufacturer’s recommendations or when a noticeable drop in performance occurs.
Maintaining a consistent schedule ensures that your equipment operates efficiently, reduces energy consumption, and extends the life of the filters.
Conclusion
In conclusion, learning how to clean range hood filters is a simple yet crucial task in maintaining a healthy and efficient kitchen environment. By following the steps outlined in this guide, you can ensure that your range hood continues to function effectively, removing smoke, odors, and grease from your kitchen. Regular cleaning not only prolongs the lifespan of your appliance but also promotes better indoor air quality. Remember to schedule routine filter maintenance, as a clean range hood filter not onl
Frequently Asked Question(How To Clean Range Hood Filters)
What do you soak Rangehood filters in?
To effectively clean range hood filters, you can soak them in a solution of hot water and a grease-cutting detergent. This helps to break down the built-up grease and grime on the filters. You can also add baking soda or vinegar to the solution for extra cleaning power.
After soaking for about 10-15 minutes, scrub the filters gently with a brush to remove any remaining residue before rinsing them thoroughly with hot water.
How do you clean a greasy range hood?
Cleaning a greasy range hood involves several steps. First, make sure to turn off the range hood and disconnect the power source if it’s an electrical unit. Next, remove the filters and soak them in a solution of hot water and a degreasing detergent.
While the filters are soaking, wipe down the interior and exterior surfaces of the range hood with a mixture of warm water and dish soap. Use a non-abrasive sponge or cloth to avoid damaging the surface. After soaking, scrub the filters, rinse them, and allow them to air dry before reassembling the range hood.
Can vent hood filters be washed?
Yes, vent hood filters can be washed, and it’s actually essential to maintain their efficiency. Most vent hood filters, especially those made of metal or aluminum, are designed to be reusable. To clean them, remove the filters from the hood and soak them in a mixture of hot water and a grease-cutting detergent.
After soaking, scrub them gently to remove any remaining grease and grime, rinse thoroughly with hot water, and allow them to air dry before reinstalling them in the hood.
How do you clean Aluminium cooker hood filters?
Cleaning aluminum cooker hood filters follows a similar process to cleaning other range hood filters. Remove the filters from the cooker hood and soak them in a solution of hot water and a grease-cutting detergent. You can also add baking soda or vinegar to the solution for added cleaning power.
After soaking for about 10-15 minutes, use a soft brush or sponge to gently scrub away any remaining grease and residue. Rinse the filters thoroughly with hot water and let them air dry before placing them back in the cooker hood. This regular maintenance will keep your aluminum cooker hood filters clean and efficient.